Plinth Lights and Tiles
Wall tiles have been cemented in place but the ones we found that we liked and were suitable were fairly thick, 10mm or so which meant we had to use special edging to ensure the tiles looked right. The edging is brushed stainless steel, quite difficult to cut smoothly and mitre the corners but with practice and a bit of care. Grouting yet to do.
To add a bit of bling, we installed some plinth lights for effect. The best value ones we discovered were form National Lighting. However, because the Wren plinths are made of the lowest possible grade of material, the holes had to be cut very carefully to avoid the MDF shredding. Also, because the MDF is rubbish quality, the plinths will warp in use if you are not careful. The plastic clips that Wren provide to clip onto the legs are so flimsy as to be useless for holding anything in place.
Wednesday, 29 November 2017
Tuesday, 21 November 2017
Fitting the Plinths
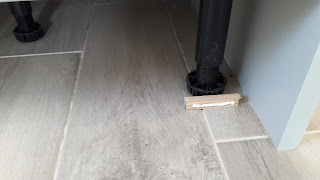
Unless you are very observant or have fitted Wren plinths before, you will not be aware that the orientation of the legs at the front of the units is quite critical. The wren fitting instructions give no guidance on this, see photos. The problem is the top flange, which is about three quarters of the circumference, is approx 8mm greater in diameter than the remaining quarter but it is this smaller diameter that has to face the front of the unit because it is this diameter that matches the diameter of the foot and against which the plinth rests top and bottom. Now, like me, if you only discover this once all the cabinets are in place and bolted together with the worktops, you have a problem if you want the plinths to be vertical. I solved this by gluing a piece of 8mm moulding to the plinth at the front area to compensate. The clips holding the plinth in place cope OK with this dimensional differential. the other problem is that these plinths are often a bit bent when delivered so they won't stay in place. This can be overcome using a plinth lock where necessary.
Unless you are very observant or have fitted Wren plinths before, you will not be aware that the orientation of the legs at the front of the units is quite critical. The wren fitting instructions give no guidance on this, see photos. The problem is the top flange, which is about three quarters of the circumference, is approx 8mm greater in diameter than the remaining quarter but it is this smaller diameter that has to face the front of the unit because it is this diameter that matches the diameter of the foot and against which the plinth rests top and bottom. Now, like me, if you only discover this once all the cabinets are in place and bolted together with the worktops, you have a problem if you want the plinths to be vertical. I solved this by gluing a piece of 8mm moulding to the plinth at the front area to compensate. The clips holding the plinth in place cope OK with this dimensional differential. the other problem is that these plinths are often a bit bent when delivered so they won't stay in place. This can be overcome using a plinth lock where necessary.
Subscribe to:
Comments (Atom)
Completion The kitchen has been completed now for a few weeks apart from a few minor snagging items to sort out. The final result is shown...

-
Fitting the Plinths Unless you are very observant or have fitted Wren plinths before, you will not be aware that the orientation of the le...
-
Worktops My biggest concern about fitting my own kitchen was dealing with the worktop jointing since this would be the first time I had at...


